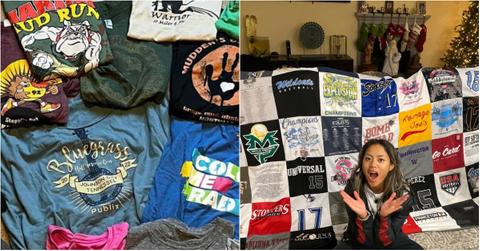
Here's a Step-by-Step Guide to Upcycling Your Favorite T-Shirts Into a Quilt
It’s hard to part with T-shirts, they hold precious memories. However, a T-shirt quilt can preserve all of these memories, and save some space.
Published April 4 2024, 12:44 p.m. ET
If you are a T-shirt hoarder like me and can’t bring yourself to give away old shirts even though there is no room in your closet, a T-shirt quilt could be your next project. Old shirts hold memories and major milestones, like your first concert, fifth-grade track meet, or high school prom. And although you might not be wearing them anymore, it sometimes doesn’t feel right to donate them either.
With a few supplies, you can transform your old shirts into a giant T-shirt blanket that will hold your memories and favorite shirts without crowding your closet. Here’s how to make a T-shirt quilt.

How to make a T-shirt quilt:
Making a T-shirt quilt requires a lot of cutting, ironing, and sewing, so you want to make sure you have all the supplies before starting. Here’s what you need, according to Project Repat.
A sewing machine
Fabric scissors
Quilt batting
Quilt backing fabric
Thread
T-shirts (20 for a large quilt, six-eight for a small)
If you plan on adding extra fabric between the T-shirts and around the edges of the quilt, you will want to pick that out also; however, sewing the T-shirts together directly also looks just as good. Now that you have gathered your supplies, here’s what to do next.
First, select your t-shirts.
Gather all the T-shirts you want to include in your quilt. Fold them into rectangles and arrange them on the floor to create a pattern. Once you have established your blueprint, take a picture and make a stack for each column, per Becky Stern.
Next, cut out of the t-shirt squares.
This is where measurements matter. Using your fabric scissors, cut the T-shirts into squares. According to Project Repat, depending on the size of your shirt, 12” by 12” or 14” by 14” squares often work best. Keeping them all the same size makes it easier to sew together later on.
Sew the shirts.
According to Project Repat, pinning your shirts together column by column is helpful when starting to sew. After you have pinned everything together, iron out all the seams to eliminate any wrinkles. Next, sew along each seam with around ½ inch of allowance. If you are making a more advanced quilt, you can sew the T-shirts to fabric panels to allow for some separation in the design, per The Spruce Crafts.
Finally, add backing to your quilt.
After you have sewed your T-shirt pieces together:
- Take your quilt batting and backing fabric and cut it to the size of your quilt.
- Pin and sew both the batting and the backing to the fabric.
- For the final step, cover the edges of the quilt by sewing strips of fabric along the perimeter, per The Spruce Crafts.
Now you have your T-shirt quilt! However, before throwing it on the couch, Project Repat recommends putting it through the wash on a gentle cycle with cold water. Once this is done, you can truly call yourself a quilter!
